Start Prescription
Entry
Start Prescription Entry opens the form to
create a new prescription.
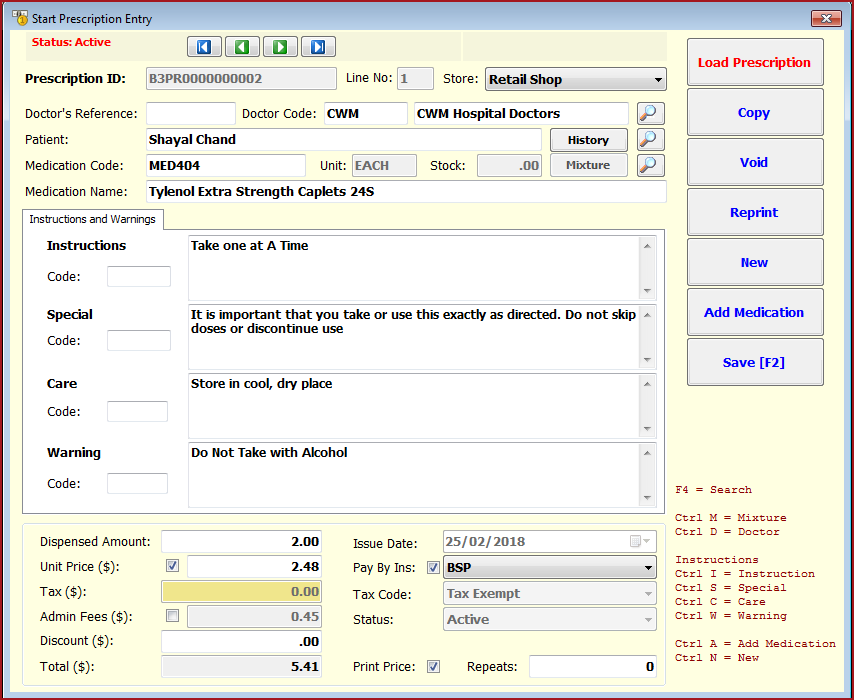
Table 1: Describes the field description on the Prescription screen.
Fields
Description
Precsription ID
Line
No
Store Doctor's
Reference
Doctor
Code Enter the Doctor Code by clicking on the
"Search Icon" or by selecting F4 on the keyboard. The Doctor’s Name
will be loaded once the code is selected.
Note:
You can also type part of the Doctor code in the Doctor Code field and
select tab. This will load the Doctor Search screen if more than one
doctor has been setup with the part of code
entered. Enter the Patients
Name. Select the
Patient using the "Search" button or by selecting "F4" on the
keyboard, if the Patient is setup as a customer.
Medication Code Medication Code is the product ID for the
medicine. Users can enter the medicine code by:-
Status
Status field shows if a user is logged On or Logged
Off. If a user tries to log on, the system gives the following
message:
‘The user is already logged in’, another user with
administrator rights can log on and set this field to Logged Off for the
use to log on.
Security
ID
Tax File
Number
Comments
The system assigns a "Prescription Number" to the
Prescription ID field once the record is
saved. Line No is system generated. This indicates the
number of items added to the
prescription. The "Store" is the location in which the prescription
is being processed. Location is loaded based on the configured default
location.
This is
an open text field, users can enter any reference number provided by
the doctors.
Patient
History
History generates the "Patient
Prescription History" report for the selected patient.
Security ID is an
encrypted field used to login into POS. The user can automatically login
using this Security ID. This ID is usually used for swipe cards and
barcode logins. Use a blank username to login with a security ID.
Generate the
UserLoginBarcode
report for print outputs. Users can generate the barcode by a username or
secruity code.
This is
the Tax Identification Number of the user.
Users can
enter any other additional
notes.
|
| |
|
1 |
The
system assigns a Prescription Number to the Prescription ID field once the
record is saved. |
|
2 |
Line No.
– System generated. |
|
3 |
The Store
Location field shows in which location the prescription is being processed. By
default, the location displayed here is defined in the User Login Screen
(Menu ID: 222) |
|
4 |
Enter
the Doctor Code by clicking on the Search button or by selecting F4 on
the keyboard. The Doctor’s Name will be loaded once the code is
selected. Note:
You can also type part of the Doctor code in the Doctor Code field and
select tab. This will load the Doctor Search screen if more than one
doctor has been setup with the part of code
entered. |
|
5 |
Enter
the Patients Name, or select the Patient using the Search button or by
selecting F4 on the keyboard, if the Patient is setup as a
customer. |
|
6 |
Enter the
Medication Code by clicking on the Search button, or by selecting F4
on the keyboard. The Medication description will be loaded once the code
is selected. Note:
You can also type part of the Medication code in the Medication Code field
and select tab. This will load the Product Search
screen. The
following information is loaded when the Medication is
selected: Instructions Unit
Price Quantity
in Stock UOM The
above is setup in Inventory Product Master (Menu ID:
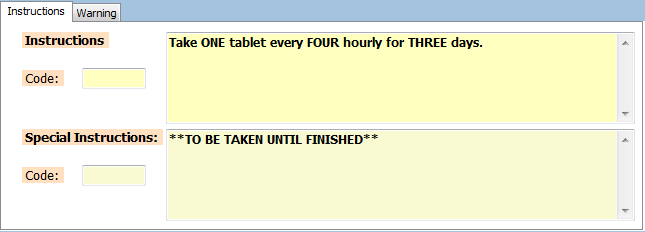
519). If
there are Instructions setup for the medication selected in the Product
Master File, this will be loaded in the Instructions and Warning tab of
the Prescription Entry screen when the Medication Code is
selected.
Medication
Instructions can be setup in the User Defined fields (Add’l Info tab) in the Inventory Product Master (Menu ID:
519). The User Defined fields can be configured in the User Defined Fields
Menu (Menu ID: 236) Alternatively,
Instructions can also be entered on the Prescription Entry screen using
the Code field. These instructions are setup in the Message Maintenance
screen and can be entered in one of the following
ways: Select
F4 on the code field. Select
Enter on the code field. The
Message Maintenance screen will be loaded, and the relevant instructions
can be selected. Creating a Mixture
Prescription : A
Product needs to be created in Inventory Product Master (Menu ID: 519) and
the status should be set to ‘Non Quantity Bearing’ Enter
the code of the Item created above in the Medication Code field and click
Tab. The Mixture button is enabled to create the Mixture . Select the Mixture button or Ctrl +
M
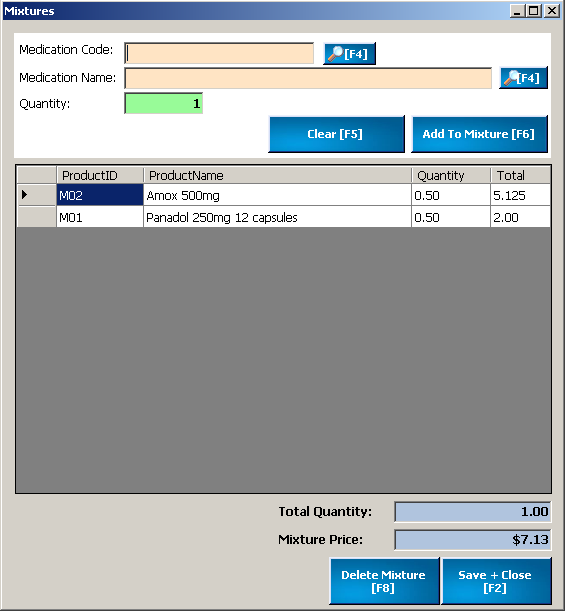
. The following screen is
displayed:
Enter
the Medication Code by selecting the Search button. The Medication Name is
automatically loaded. Enter
the quantity and select the Add to Mixture button or F6. Repeat this step to add
other medications to the Mixture. Once
all the items needed to make the Mixture are selected, click on Save +
Close, or F2. This will return the user to the main Prescription Entry
screen. The
Price for the Mixture will be loaded and the user can proceed to enter the
other details. |
|
7 |
Enter
Dispensed Amount. |
|
8 |
If
the Medication requires repeats, enter the number of repeats for the
Medication in the Repeats field. |
|
9 |
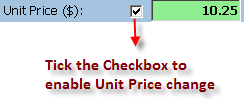
Unit
Price is loaded when the medication is selected. You can override the Unit
Price by ticking the box. This enables the Unit Price field which allows
the user to override the unit price.
|
|
10 |
The
tax portion will be displayed in the Tax field.
|
|
11 |
Admin Fees are predetermined. You can override the Admin Fees by ticking the box.
This enables the Admin Fees field which allows the user to override the
Admin Fees.
Admin
Fees can be configured in the Configuration Menu (Menu ID: 237) under POS
Prescription Module |
|
12 |
Total
field is automatically calculated using Dispensed Amount, Tax, Unit Price
and Admin Fees. |
|
13 |
The Qty in Stock
field shows how much quantity is available for the selected
item. |
|
14 |
Unit
– the UOM this item is stored in. |
|
15 |
The
status field changes as the prescription line is created and
processed. |
|
16 |
Issue Date
– the date the medication was issued. By default this is the system
date. |
|
17 |
Tax Code
– display the tax code for the item
selected. |
|
18 |
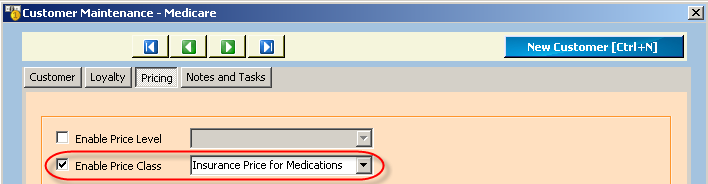
Pay By Ins – Check this field if the Prescription will be paid by Insurance Company. The price for the item selected will be different from the standard price setup in the Inventory Product Master if if the price level or price class is enabled for the insurance company.
Example This is setup in Price Class (Menu ID: 517) and the
Price Class is attached to the Insurance Company which needs to be setup
in Customer Maintenance under the Pricing
tab:
When the insurance company is selected in the Prescription Entry screen, the unit price is displayed depending on the price class setup.
The customer loaded on POS Grid will be the respective insurance
company for all patients who have Pay By Ins
ticked.
|
|
19 |
Print Price
– This field is checked to print price on the Prescription
label. |
|
20 |
When the first line is created, select the Save button or F2. The Prescription Label is printed:
|
|
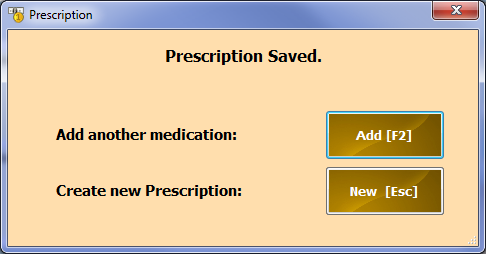
21 |
The
following screen will be displayed and the user can either select to
create a New Prescription or Add Another Line to the same Prescription
Entry:
|
|
22 |
Repeat
the above steps to Add Another Line or Create a New Prescription
Entry. |
|
23 |
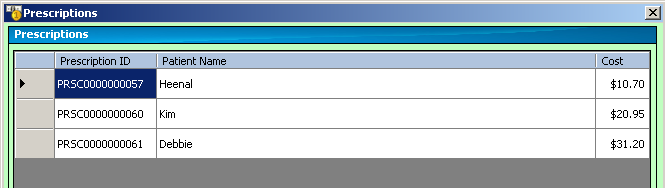
All
Prescriptions are processed through the POS Processing screen. In the POS
processing screen, from the Prescription Menu, select
Load.
This will show all the Prescriptions which needs to be processed. The cashier can now select the Prescription for the relevant Patient and process the transaction.
|