Integration Setup menu maintains the integration configurations.
Integration Configuration and Setup Requirements.
-
Users need configure the below for ATO Single Touch:
-
Users need configure the below for FMS File Export: This will generate a flat file with data from LinkSOFT. The file can be imported by supported third party applications.
-
General Ledger Journal - Set the value as "Yes". Set the configuration for "EnableIntegrationScheduler" to "Yes" in the web config file.
-
-
Users need configure the below for FMIS DQL API :
-
"ServerName" - Leave the server name blank if the LINKSOFT and FMIS database are on the same server. System will directly connect to the database.
-
The server must be specified if the servers are on different machine. Users need to configure "Distributed Transactions Coordinator (DTC)"
-
-
DatabaseName" -This is the name of the FMIS database.
-
"Username" and "Password" - This is the login details for the server on which the database is hosted. Update the details if the LINKSOFT and External databases are hosted on different servers.
-
"OrganisationID" - This is only required for Epicor and Link Integration. Organisation ID is stored under "General Ledger --> Maintenance --> Setup --> Organisation Setup --> Organisation."
-
"CompanyCode" - This is only required for Epicor and Link Integration.Company Code is stored under "General Ledger --> Maintenance --> Setup --> Company Definition."
-
Set the value as "Yes" to enable integration for below components:
-
AccountsPayableMaster - Enable integration to Accounts Payable Master
-
AccountsPayablePurchaseGLGroup - Enable integration to Accounts Payable Purchase GL Group
-
AccountsPayablePurchaseOrder - Enable integration to Accounts Payable Purchase Order
-
AccountsReceivableAdjustment - Enable integration to Accounts Receivable Adjustment
-
AccountsReceivableMaster - Enable integration to Accounts Receivable Master
-
AccountsReceivablePaymentMethod - Enable integration to Accounts Receivable Payment Method
-
AccountsReceivableReceipt - Enable integration to Accounts Receivable Receipt
-
AccountsReceivableSalesOrder - Enable integration to Accounts Receivable Sales Order
-
AccountsReceivableTransaction - Enable integration to Accounts Receivable Transaction
-
BusinessIntelligenceReports - Enable integration to view data in reports
-
GeneralLedgerJournal - Enable integration to General Ledger Journals
-
GeneralLedgerMaster - Enable integration to General Ledger Master
-
Inventory - Enable integration to Inventory list.
-
MultiCurrencyMaster - Enable integration to foreign currency setup and conversions.
-
TaxMaster - Enable integration to tax labels and rates.
-
-
-
Users need configure the below for FRCSSDC . (Only applicable for VAT Monitoring Setups in Fiji). An email alert will be sent if there is a failure in FRCS Integration. The email will be sent to the email address configured in "LinkWeb - Company Administration - Document Template - FRCS Web API Alert".
-
MinimumProductQuantity - This value is defaulted to 0.001. Change according to FRCS requirements.
-
AllowedTaxLabel - This value is defaulted to A,B,E,F,N,P
-
TaxIntegration_ESDC_Enabled - Set the value to "Yes". Users need to configure below rules:
-
Tax Integration (ESDC) API URL - Enter the "API URL" for ESDC. For Example, http://192.168.0.107:8180 . "192.168.0.107" is the IP of the machine on which SoftESDC is installed or the IP of the Inspur of the device. "8180" is standard.
-
Tax Integration (ESDC) Secure Card PIN - Enter the "PIN"number of the smart card.
-
Tax Integration (ESDC) Batch Size - This is number of transactions per batch to integrate into LinkSOFT. This is defaulted to 100.
-
CashierTaxFileNumber - Enter the "Tax Identification Number" of the user who posts invoices.
-
-
-
Users need configure the below for Helpdesk EmaiL Import :
-
Email Server - Enter the address of the mail server.
-
Email Port - Enter the email port number.
-
Emal Use SSL - Set the value as "Yes" is SSL is required.
-
Email Username and Password - Enter the credentials to authenicate the email setup.
-
"New Call" Template - Create a template under "New Case Template ". This template will used to created the cases from Email.
-
-
Users need to configure the below for "PAYDirectBankFile","PAYSuperFile " and "PAYTaxFile ".
-
Email Address - Enter the email to which the file should be sent. Users can enter multiple addresses separated by a semicolon.
-
Email Body - Enter body of the email.
-
File Extension - Enter the file extension for the electronic files.
-
Steps to Configure Refer to Figure 1.
-
Click on the "Grey Triangle" next to the code to expand into the details.
-
Click on the "Pencil Icon" to edit details.
-
Enter the details and "Save" record.
-
Edit the Module as mark it as "Active"
-
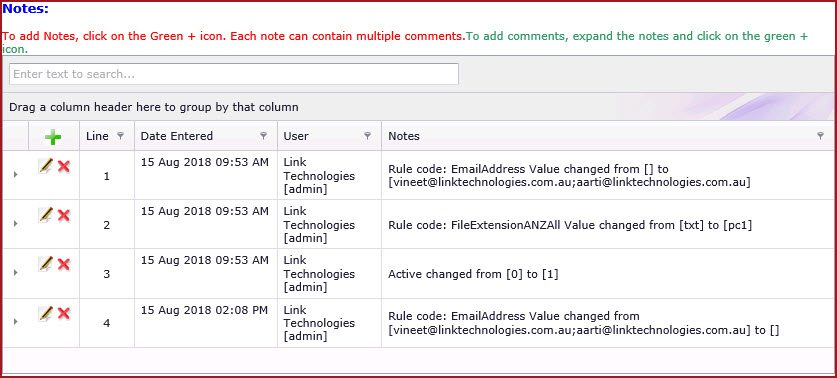
"Notes" section will record configuration values that are changed. Refer to Figure 2.
Figure 1 : Integration Setup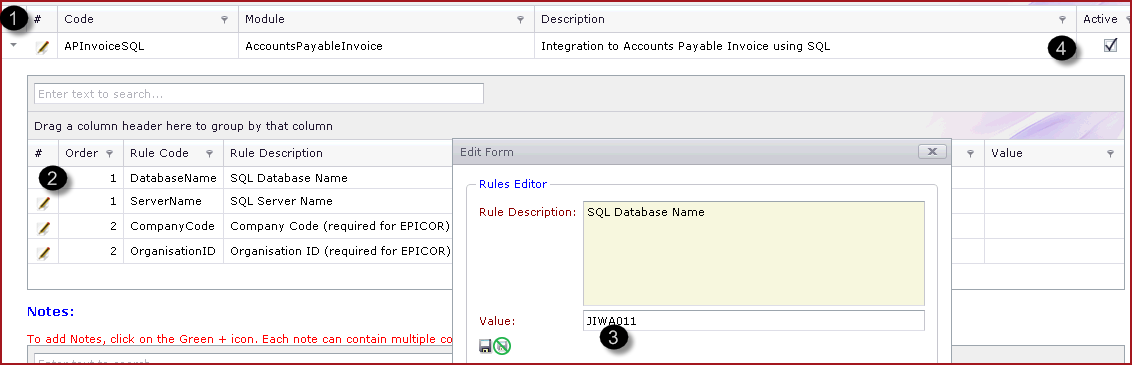
Figure 2
:
Integration
Notes