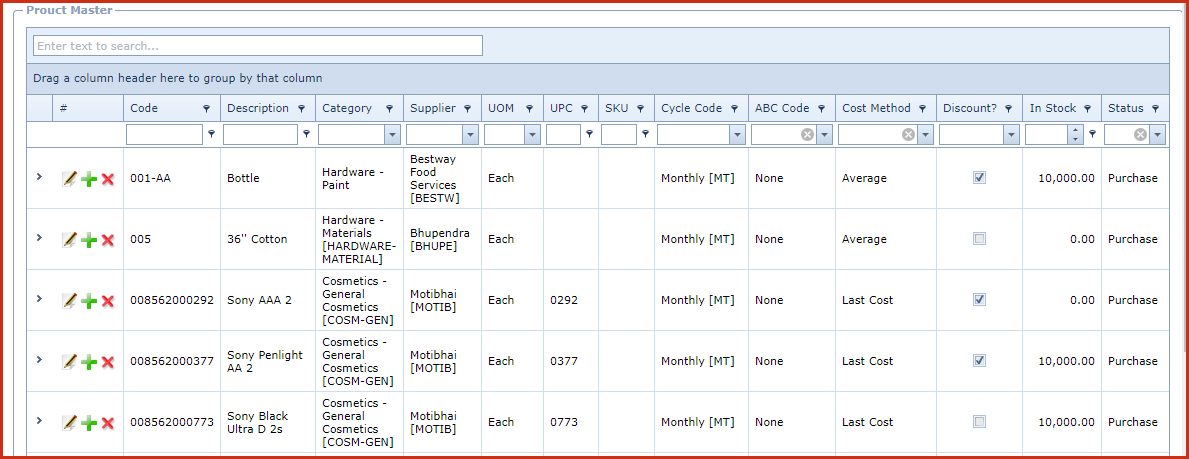
Product Master is used to create and
maintain key information about an inventory item. Following components are
manages under on the Product Master:
- Product Setup
- Product description and product properties.
- A product can have multiple barcodes
- Locations
- Product Pricing
- Customer Specific Prices
- Kit and Custom Kit Setup
- UOM Conversions
Notes
-
When creating an inventory item, the defaults will be saved if the user does not select
required fields before saving the record.
-
Users can configure the number of items to load on the
product master. The default is 24.
-
Navigate to "Link Technologies Application Folder -
LinkWeb - web.config" file
-
Locate the configuration "DefaultGridViewPageSize"
-
Set the count against the "Value"
-
Save
Reports
-
Inventory Listing
-
Inventory
Price Setup Listing
-
Inventory
Sell Price Listing
Security Access
The following security access are
used in product master:
|
Menu Code
|
Description
|
Access Level |
| IV519 | Product Master |
Active,Add, Edit, Delete
|
| IV5199 |
Can change "Cost Method" in menu "Inventory -> Product
Master" |
Active |
| 640-13 |
Allow Inventory stock level view |
Active |
| 519-1 |
Can view/edit Inventory Product Cost in all forms and
reports |
Active |
Steps to create Product
-
Click on the "Green
Plus Sign". This will open the "Edit Form".
-
Enter below
details:
-
Go to the "Product Master
Tab"
-
Code- Enter a code
which can be a set of alphanumeric values to uniquely identify each cycle
code.
-
Users can edit the code to change the
product code.
-
Description- Enter
the detailed description of the cycle code.
-
Category - Select
the category from the list. Category is
maintained under "Linkweb - Inventory - Category".
-
Supplier - Select
the supplier from the list. Supplier is maintained under "Linkweb -
Inventory - Supplier
Maintenance".
-
UOM - Select the
UOM from the list. UOM is maintained under "Linkweb - Inventory -
Unit of
Measure".
-
Currency - Select
the currency from the list. Currency is maintained under "Linkweb - Global
Administration- Currency".
-
Price Class - Select
the price class from the list. Price Class is maintained under
"Linkweb - Inventory - Price Class".
-
Cost Method -
Select the cost method from the list. Cost Method is maintained under
"Linkweb - Company Administration- Dropdowns - Inventory Cost Method".
-
Average Cost - Average Cost is system
controlled. Average Cost is calculated
as:
-
[(Current Instock X Current Cost) + (New Instock
x New Cost)]/ (Current Instock + New
Instock).
-
Standard Cost - Standard Cost
-
Last Cost -
-
Status - Select the
status from the list. Status is maintained under "Linkweb - Company
Administration- Dropdowns - Inventory Status".
-
Purchase - Physical items that are
bought and sold at the same state.
-
Kit - Products
created in house which other purchased items.
-
Non Quantity Bearing - Non physical
items.
-
Obsolete - Items that are not sold or
are discontinued.
-
Minimum Profit
Percent - This is used calculate the minimum selling price of a product to
reach profitability. For example, cost of item is $5 and the minimum
Profit Percent is
20%.
-
Assuming tax is 9%, the selling Price
is calculated as $6.54 (5 x1.2x 1.09).
-
Users will not be able to sell the
item lower then $6.54.
-
Discount will only be allowed up to
$6.54.
-
Sell Price - Enter
the selling price of the product. This will update the products quantity
break 1 price.
-
Use Location Price
- Tick the "Check Box" to use Location Price. This will allow users to set
different prices at different locations.
-
Discount - Tick the "Check Box"
to allow discount for the product.
-
Go to the "Stock and Other Properties
Tab"
-
UPC - Enter the
"Unique Product Code" of the item.
-
SKU - Enter the
"Stock Keeping Unit"code distributed by the
supplier.
-
Cycle Code - Select
the cycle code from the list. Supplier is maintained under "Linkweb -
Inventory - Cycle Code".
-
ABC Code - Select
the ABC Code from the list. Status is maintained under "Linkweb - Company
Administration- Dropdowns - Inventory ABC Code".
-
Weight - Enter the
weight of the product.
-
H - Enter the
height of the product.
-
W - Enter the
width of the product.
-
L - Enter the
length of the product.
-
Lot Bin - Tick the
"Check Box" if the product is a serialized item.
-
Bulk Item - Tick
the "Check Box" to mark the item as "Bulk".
-
Bulk Items are located separated and
dispatched at sale.
-
A bulk slip is generated at sale which
is used to release goods from the bulk or
warehouse.
-
Custom Kit - Tick
the "Check Box" if the product is a it
where users have the ability to select each item.
-
For example, regular coffee. The
customers can choose if they want milk or black
coffee.
-
Product Matrix -
Select the matrix from the list. Supplier is maintained under "Linkweb -
Inventory - Product
Matrix".
-
Product Row
Matrix - Select the matrix for
row.
-
Product Column
Matrix - Select the matrix for
column.
-
Allow Fraction - Tick the box to use
fractions.
-
For example an item sold as kilogram or litres will have this
flag turned on. Items such as a can of coke will have this flag turned
off.
-
Rules for allow fraction is validated
when a transaction is performed.
-
Go to the "Notes
Tab"
-
Save.Click on the "Floppy Icon".
Figure
1: Product Master