Users are required to setup the database connections that specifies the
data sources. The connection string includes the server and database
details. This must be done before using LinkSOFT.
The following components must be configured for
LinkSOFT.
-
LinkWEB
-
LinkWEB is automatically installed as part of the
"LinkSOFT Installer".
-
LinkWEB runs on the "Internet Information
Services" web server.
-
Follow below setups to configure the connection
details.
-
Navigate to the "Internet Information Services Manager" in windows.
-
Expand the connections into "Sites - Default Web Site - LinkWEB".
-
Right click on LinkWEB and select the "Explore" option. This will open the LinkWEB site files.
-
Open the "web.config" file in "Notepad".
-
Update the below details
in line number 14. Refer to Figure
1.
-
Data Source - Enter the
server address.
-
Database - Enter the database
name.
-
Save.
-
The "Web.Config" file contains several settings
that can determine how the web site will work.
-
Do not
change the Security Info on the "Connection String" section
-
The connection String "Password" is encrypted using a complex
256 bit encryption algorithm. Please do not change these values.
-
The Web.Config is not encrypted as users can use
this to fine-tune how the web aplication works. This is particularly
important for load balancing and high volume data processing.
-
Scheduler
-
-
The scheduler will run processes for multiple companies.
-
LinkSOFT Scheduler
setup options:
-
Web Scheduler
-
The web scheduler manages background processes
through the application pools in “Internet Information System (IIS)" .
-
Follow below setups to enable the web
scheduler.
-
Navigate to the "Internet Information
Services Manager" in windows.
-
Expand the connections into "Sites -
Default Web Site - LinkWEB".
-
Right click on LinkWEB and select the
"Explore" option. This will open the LinkWEB site files.
-
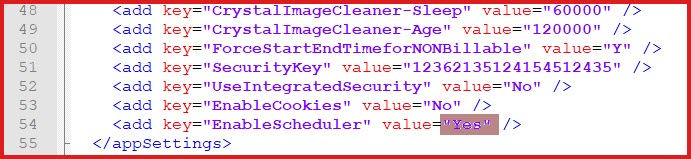
Open the "web.config" file in "Notepad"
-
Set the value for "EnableScheduler" to "Yes"
in line number. Refer to Figure 2.
-
Save
-
If you need to configure additional schedulers
for multiple databases you can create additional site
files.
-
Point of Sales - Is a
desktop application where the connection string can be accessed from the
POS application
.
Figure 1: LinkWEB
Connection String

Figure 2: Enable
Web Scheduler