Users can launch Link POS from the shortcut created on the desktop. The
following functions are available:
- Change Server / Database details
- Login to Link POS
- Login by scanning a User barcode
1. Change Server / Database details
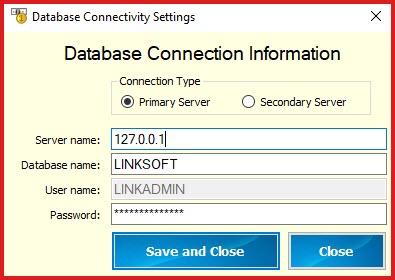
To change the Server details, enter "CTRL
+ Z" on the login form. Refer to Figure 1.
- Connection Type - Used to configure
fail-safe .
Default value is "Primary Server"
Server - This is the server name or IP
address of the machine on which the database is
hosted.
Database - This the database to which
the application will log in.
Username - SQL Login used to connect to
the database. This field is system assigned.
Password - Enter the password for the
"LINKADMIN" SQL Login.
See information on "How to change Application SQL User Password
"
2. Login to Link POS
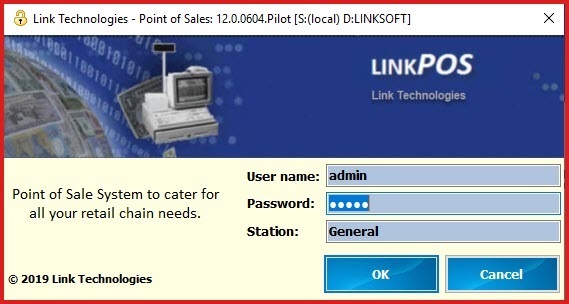
Enter the following details to login to
POS. Refer to Figure 2:
- Username -Username for a user assigned
by the administrator. New users can be created User Login
.
- Password -
Password assigned to the user by the System
Administrator. Recommended user change password at first
login.
- Station -
Select the Station
Layout
3. Login by scanning a User
barcode
Users can login to Link POS by
scanning a barcode which contains a security key. To implement this, follow
these steps:
- Configure the user to login via a Security code
- Print the user key card using the report
"Label - Use Login - A4 (64 x 33.8 mm)"
- Scan the barcode on the Link POS login
screen.
- This key can also be used to authorize
the user within the Link POS application.
4. Notes
The message "Invalid Username/Password"
means one of the following:
- Username is invalid
- Password is invalid
- User account is not approved.
Figure 1: Database
Connectivity Settings

Figure 2 : POS Login Screen

 Link Technologies - LinkSOFT Documentation
  Link Technologies - LinkSOFT Documentation
