Generate Setting 3 contains the below
settings.
-
Cash Receipt
Threshold - Threshold is the transaction value for which
system would print the receipt. For example if the Threshold is set as
20.
-
Cashier makes a sale of $15.00. Receipt will not
print.
Cashier makes a sale of $25.00. Receipt will print
because 25 is greater than 20.
Combine PARK transactions to an existing PARKED
transaction - This configuration allows
users to add more products in an already parked transaction. For example,
"Customer A" ordered pizza, this order was parked. After 15 minutes "Customer
A" orders fries. Cashier can combine fries in the parked transaction for
pizza.
Default POS Customer Search Group - Default POS Customer Search Group is used to
default customer search list based on
Customer Type
. For example, "Customer A" has the customer type as
"Staff" and "Customer B" has the customer type is "NGO". If the "Default POS
Customer Search Group" is set to "Staff", only "Customer A" will appear
in
the customer lookup in
POS.
Enable Fast Cash Receipt
Mode - If "Enable Fast Cash Receipt Mode" is set to "Yes", when the cashier saves a sale system will directly open
"Payment Details" screen for the cashier to enter
the cash amount received.If the configuration is "No", a list of payment options would be loaded and the cashier is required
to select the applicable payment option.
Force Customer selection on PARK - If "Force Customer selection on PARK" is set as "Yes", the
customer search screen will open to select the customer before parking a
transaction.
Grid Height in pixels - Grid
Height in pixels is used to configure the height of a row on the POS Grid. Rows are created when
items are loaded on the POS Grid. Default row size is 30
pixels.
Print Bulk Item on PARK - If "Print Bulk Item on PARK" is set to
"Yes", system will print a Bulk slip when the cashier parks a
transaction. This is only applicable for products that have "Bulk Item"
enabled on the
Product
Master
.
Print Non-Bulk Item on PARK - If "Print Non-Bulk Item on PARK" is set to
"Yes", system will print a Non-Bulk slip when the cashier parks a
transaction. This is applicable for products that do not have "Bulk Item"
enabled on the
Product
Master
.
Print Park Transaction
Slip - If "Print Park Transaction Slip" is set as "Yes", system will print a park slip
when the cashier parks a transaction.
Prompt for additional notes on PARK - If
"Prompt for additional notes on PARK" is set to as "Yes", system will open the notes screen for the cashier to
enter notes when parking a transaction.
Prompt to email customer documents
(Y/N)
If the configuration is set to "No", a receipt will be printed
after a sale is completed in POS.
If
the configuration is set to "Yes", below options will be available
after a sale is completed in POS
Print Receipt
Email Receipt - "Email" option does not email "Bulk and
Non Bulk" slips. These slips
are printed.
Print and Email Receipt -"Print and Email"
option does not email "Bulk
and Non Bulk" slips.
Cancel - "Cancel" option prints "Bulk
and Non Bulk" slips.
Below configuration is required to
configure VAT Monitoring System in Fiji.
ESDC Setup
Tax Integration (ESDC) API URL -
Enter the API URL. For Example,
http://192.168.0.107:8180 . "192.168.0.107" is the IP of the machine on which
SoftESDC is installed. "8180" is standard.
Tax Integration (ESDC) is Enabled
(Y/N) - Set ESDC is
Enabled to "Yes" to activate ESDC.
Tax Integration (ESDC) Secure Card
PIN - Enter the Secure Card PIN.
This will be provided by FRCS.
VSDC Setup
Tax Integration (VSDC) API URL
- Enter the API URL.
Default URL is provided by FRCS.
Tax Integration (VSDC) Certificate Serial
Number -
Enter the VSDC certificate serial number.
Tax Integration (VSDC) is Enables
(Y/N) -Set VSDC is
Enabled to "Yes" to activate VSDC.
Steps to Configure Settings
Click on the required
setting. The configuration box will open.
Enter the
required setting under the "Value" section.
Click on "Save" to save changes.
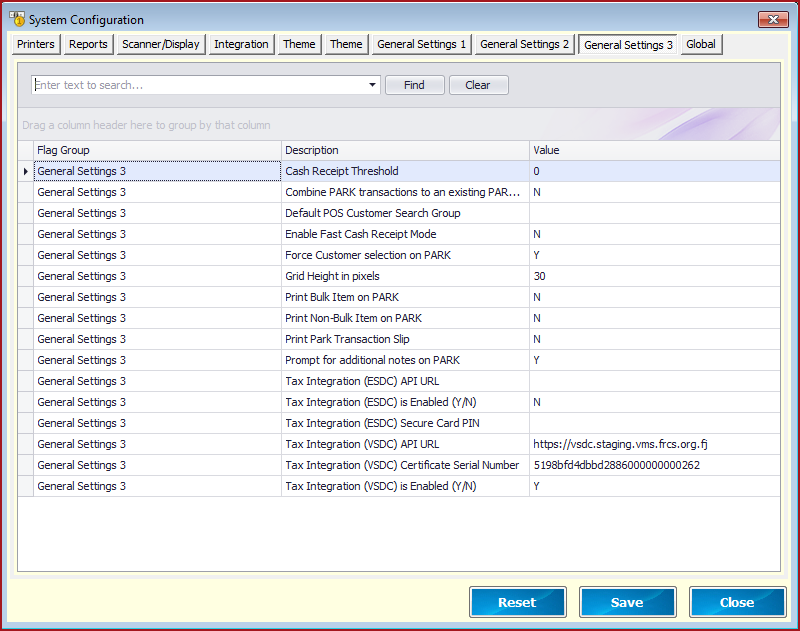
Figure 1
: General Setting 3