New Call - Detail case is used to
create a detailed case in helpdesk . User creating
the case can assign the case to other users.
Steps to create a Call:
-
Navigate to
"Helpdesk" -> "New Call - Detail". This will open the form with the
"Call Header"
tab. Refer to Figure
1.
-
Enter below
details:
-
"General"
section consist the following:
-
Call - This is the "Call
Number". Call Number is system generated.
-
Status - When creating a call
the status is "New". Status is updated by call
comments.
-
Logged Date - The "Logged
Date" is defaulted to the present date. Users can change this
date.
-
-
Private - Calls marked as private are only visible to
users in the "Notifications" list. To grant access to a private call, add
the user to the "Notifications" list.
The following rules apply to private
calls:
-
To
add a private call to a project, the project manager must have access to
the call.
-
When changing the project manager, ensure the new
project manager has access to all the private calls in the
project.
-
There must be at least
one user in the "Notifications" list. This is to prevent being lockout
from a private call.
-
Admin Lock - This is used
to lock the case header from editing.
-
"About Me" section
consist the following:
-
Logged
By - "Logged by" is the user who creates the call. By default "Logged
by" is the user logged into Helpdesk when the call is
created.
-
Users can change the "Logged By"
user
-
If the "Logged By"
is changed the call header
is updated with the details. Refer to Figure
2.
-
The field labels for "About
Me" are configured under "LinkWeb -> Company Administration ->
Configuration -> Helpdesk -> Alias Name".
-
"Classification"
section can be user defined.
-
The labels for these
are configured under "LinkWeb
-> Company Administration -> Configuration
-> Helpdesk -> Alias Name"
-
Costing" section
-
"Resolution Details" section consist
the following:
-
Assigned To
-
-
Resolve
By
-
Project - "Project" contains
a list of projects in Helpdesk which allows users to add calls to a
project.
-
To add a call, select the
project from the list and save.
-
Users need to have access
to "Has Access To All Projects" . Access is enabled under "LinkWeb ->
Global Administration -> Role Menu
Access"
-
Enter the
"Subject" and " Call information" in the
"Call Subject and Detailed Information" section
-
Save
-
"Copy" is used to copy
the "Case Header" of the existing call.
- The copied
call will be loaded on the screen once the copy command has been
successfully completed.
-
"Copy"
will copy the original call header. If user edits call content and
copies the call, a call will be created with the
original details.
Call Features
-
Call
Header
-
"Call Header" contains the case
details and contents as listed under "Steps to
create a Call"
-
Comments
-
The
"Comments" tab will be activated once a call has been created.This is
used to add call details in the "Enter Comments"
section.
-
Users can use predefined
templates to update call comments. Templates are maintained under
"Linkweb - Company Administration - Document Templates".
-
Costing
-
What Next
-
Command and
Controls
-
Create
New Case - This will create a new call using the comments entered. The new
call will have the comments as the call header, the call header details
will inherited
from the original
case.
-
Mark
as Solution - This will
mark the comment as
solution.
-
Extend Resolve By - Users can tick "Extend Resolve By" to extend the call
completion date based on the "Follow Up Date". The
call header "ETC" is extended and a comment is added to show the
old and new "ETC" dates.
-
Send Notifications - Tick
this box to send notifications to users in the notification
list.
-
History
-
The
"History" tab will be activated once a call has been
created.
-
The history shows the full content of the call where
the case header and comments are consolidated.
-
Related Items - Related Item is
used to add features and functions that must be tested for a Helpdesk
Call.
-
Select the related
item from the list.
-
-
Expand into the
details of the related item.
-
Click on the "Green Plus Sign". This will open the
edit form.
-
Enter below details
- Description - Enter the description of what to
test for the new.
-
Status - Select the status from the list
-
Save. Click on the "Floppy Icon".
-
Expand into the details of the "Related Items Details",
this will load the "Related Items Log". Refer to Figure 3.
-
Enter below details:
-
Description - Enter the test results.
-
Version - Enter the version of LinkSOFT in which
was the test was performed.
-
Reference - Users can enter referential
notes
-
Status - Select the status of the test.
-
Deleted - This will delete the record.
-
Save. Click on the "Floppy
Icon".
-
Notifications
-
The
"Notification" contains the list of users. An email alert is generated on the following
actions:
-
New case
logged
- Notification is sent to
the users in the notification list except to the user logging the
case.
-
Existing case edited -
Notification is not sent
-
New comment added - Notification
is sent to the users in the notification list except to the user adding
the comment. The option "Send Notifications" is checked when adding a
comment to send the email alerts.
-
Existing Comment is edited -
Notification is not sent.
-
A user is automatically added to
the notifications if the user logs or comments on the
call.
-
The helpdesk administrator can
add "Additional Emails" for a user. Add multiple email addresses separated by a
semi-colon (;).
-
The helpdesk
administrator can add new users to the call notifications. The user
account must be created under "Linkweb -
Global Administration - User Maintenance".
-
Notes and
Attachments.
-
Figure 1: New Call - Detail
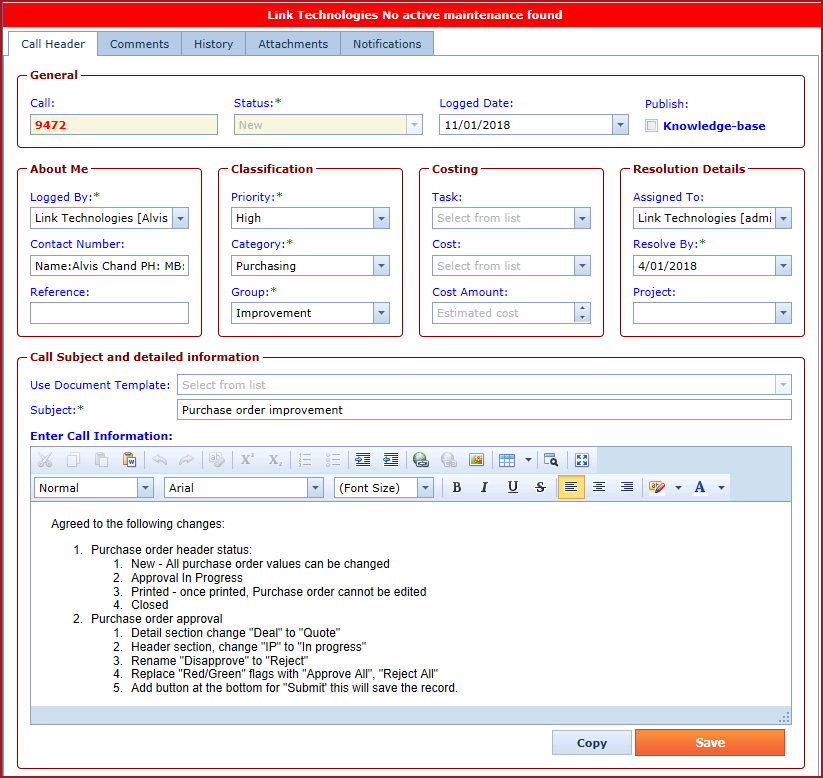
Figure 2: Logged By details


